Geeni cameras scan QR codes to seamlessly pair with your device. This does sometimes have its hiccups though, as users occasionally report errors in the scanning process. But not to worry - this is a known but easily resolvable issue!
Failures in QR code scanning are normally caused by camera obstructions, dim screen settings, and occasional bugs in the Geeni app. Fortunately, there are many user-attested fixes for each issue (with the top solutions listed below!).
What’s more, the Geeni app also allows you to bypass the QR scanning process by enabling Easy Mode. As such, you have plenty of options to resolve a failed QR code scan - we will guide you through each one step-by-step!
3 Fixes for a Geeni Camera that Won’t Scan QR Code
Adjust your screen settings
QR codes are essentially messages encoded into a visual black-white pattern - if your Geeni camera can’t distinguish between black and white, then it won’t be able to read the code. This typically happens with dim or uniquely configured screens.
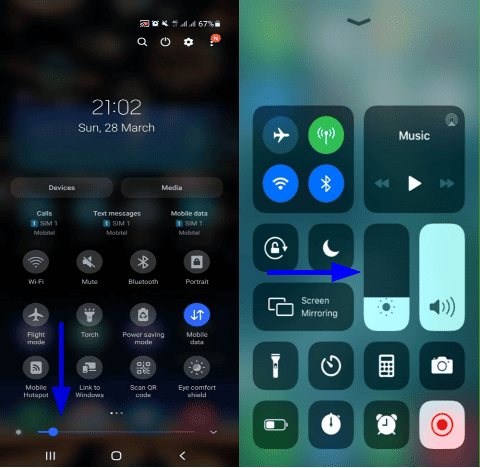
When showing the QR code to your Geeni camera, ensure that your screen is at the highest brightness. To do this, simply drag down the top of your device’s screen and move the brightness slider on the quick panel, as shown above.
Turn off dark mode and blue light filtering
Certain devices also come with a built-in dark mode and blue light filtering (aka eye care and night shift mode), both meant to reduce eye strain.
Depending on the device, they can invert colors or force low screen brightness- sure ways to cause issues with QR code scanning! For some users, these well-known culprits for QR code scan failures may be active for so long, they forget that they exist. Thankfully, both modes can be disabled very quickly by toggling them in your device’s settings for both Android and iOS devices.
Remove any obstructions to the camera
One of the most common reasons a Geeni camera fails to scan a QR code is because the camera's view is partially blocked.
That said, make sure there are no objects obstructing your Geeni camera’s view. This may seem obvious, but some obstructions can be sneaky.
For instance, shadows are an often-overlooked obstruction. When scanning the QR code on your device, ensure that your Geeni camera is in a well-lit place free from shade.
Clean the camera lens

Even a little debris can prevent the camera from focusing properly during a scan, so it’s best to consider cleaning the lens. While a simple fix, you’d be surprised with how much this works!
Before initiating the scanning process, check for dust or smudges on the camera lens itself. Then, clean the lens using a microfiber cloth, preferably with screen cleaning fluid. This should clear any debris preventing your camera from scanning your QR code.
Switch to Easy Mode
As QR mode is the default painting option for the app, it’s easy to assume that it’s the only option. However, you can totally skip the QR scanning process via the Geeni app’s Easy Mode!
With Easy Setup mode, you’ll only need to wait for the app to pair your Geeni smart camera until its status indicator blinks - no need for a QR code at all.
Enabling easy mode is much like pairing your smart camera as normal. You’ll only need to do one minor adjustment, as explained in the steps below:

- Reset your Geeni smart camera by holding down the reset button or inserting a paperclip into its reset hole. Then, open your Geeni app and tap on the ‘+’ sign in the top right.
- Navigate to WiFi Camera and enter your WiFi password on the next screen. Afterwards, select Next Step.
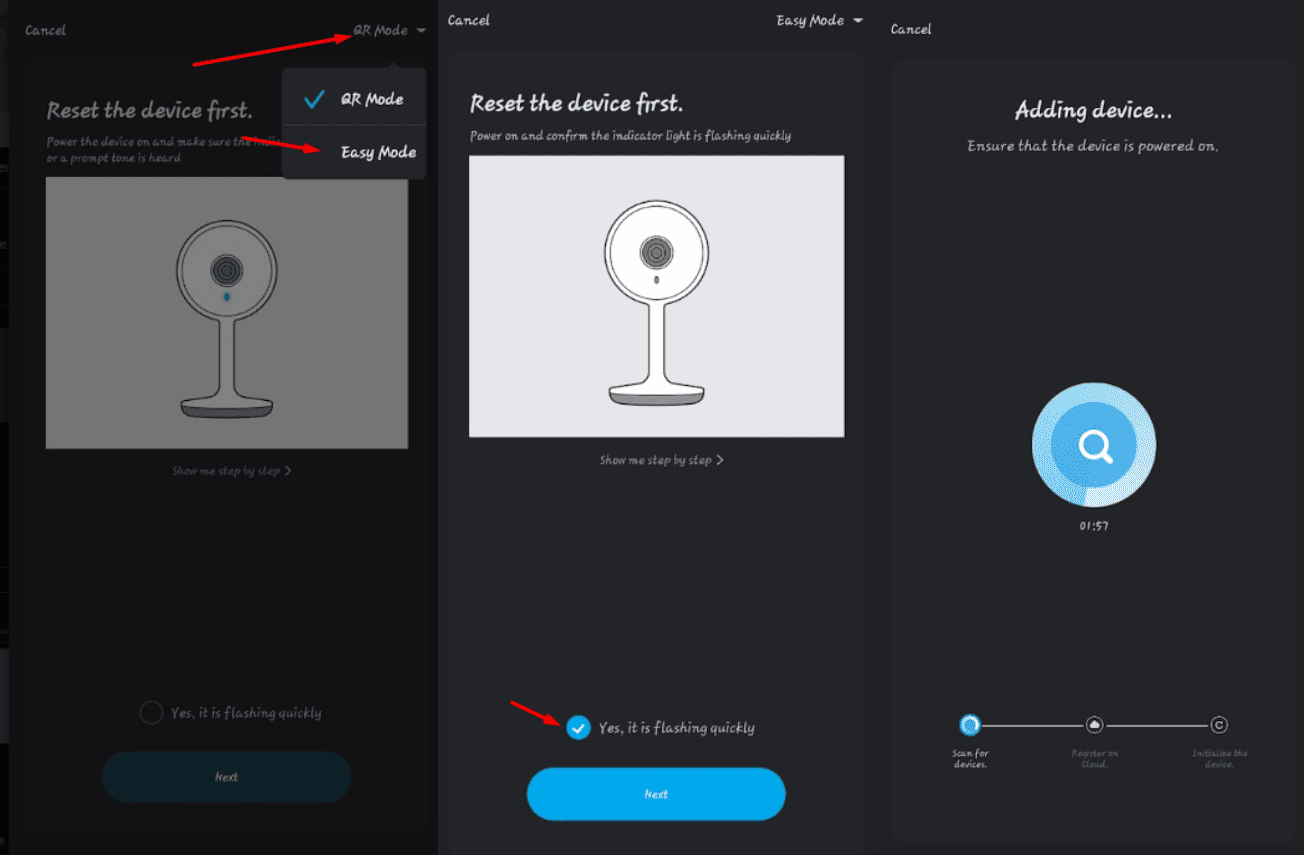
- You should see QR Mode in the top right corner. Tap on this, select Easy Mode, and confirm ‘Yes, it’s flashing quickly.’
- Tap on Next Step and wait for about two minutes. Once your smart camera has been connected, finalize the process by hitting Done.
Your camera should now be paired to your device without issues - all without having to use a QR code!
Here are some troubleshooting steps to try for that "Microphone modes are currently available" error on your iPhone or iPad:
- Make sure your iPhone or iPad is updated to the latest iOS version. Go to Settings > General > Software Update to check for and install any available updates.
- Try restarting your iPhone by holding down the Power/Side button and sliding to power off. Wait 30 seconds, then turn your iPhone back on. This can help clear out any glitches.
- Check the microphone settings in Settings > Privacy > Microphone and make sure microphone access is enabled for any apps you want to use it with. Toggle access off and back on for the problematic app.
- Check if the app you’re using is having issues with your microphone. Delete and reinstall that app to potentially fix any problems.
If it's still not working, an appointment at the Genius Bar or an Apple-authorized service provider would be recommended. But try these troubleshooting steps first:
Troubleshooting “Microphone Modes Are Currently Unavailable”
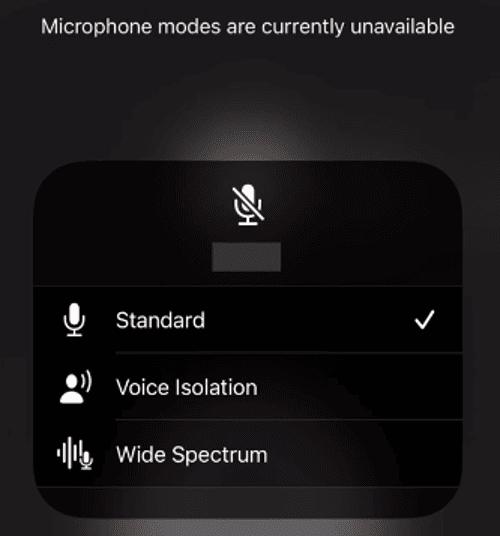
When trying to record or speak on apps like Instagram, Messenger, and Facetime on your iPhone or iPad, you may sometimes receive an error stating “microphone modes are currently available”, preventing you from using your microphone.
This error is quite recent and is likely caused by some faultiness in older iOS versions. Fortunately, there are a few fixes you can handily try to solve this issue:
1. Restart your iPhone or iPad
Most minor software issues on your iPhone or iPad can be fixed by a quick restart. Try these steps when encountering the “microphone modes are currently unavailable” error:
- Before restarting, make sure your device is not currently charging and you have no critical apps open that could get closed out.
- To restart, hold down the Power/Side button on the top or right side of your device until you see the "Slide to power off" prompt appear on your screen.
- Swipe the on-screen slider to the right to fully power down your device.
- Wait approx. 30-60 seconds before powering back on to give the device time to discharge any residual power.
- Finally, press and hold the Power button again until you see the Apple logo appear to reboot your iPhone or iPad. Give it a few minutes to fully load back up.
- Test if the error persists by opening an app that uses your microphone.
2. Check your microphone access on your Settings
The app permissions for the microphone may have been switched off. Here are steps to address this:
- Open the Settings app and select Privacy & Security, then choose Microphone to view and adjust microphone access.
- Look for any apps listed here that show the microphone toggle switched off and switch them on if you need microphone access for that app.
- You can also toggle any app's access off and back on to refresh the microphone permissions.
3. Check if the app you’re using is having issues with your microphone
The app you’re using can have its own microphone glitches. To solve this, follow these steps:
- Test if the microphone works in another app like Voice Memos or Siri to isolate the issue.
- If the mic only fails in one app, deleting and reinstalling that application can potentially resolve any corrupt files or errors.
- Fully delete the app, restart your device, and then download a fresh version of the app from the App Store.
4. Update your iOS to the latest version
Your iOS may need an update to resolve microphone bugs. Here’s a simple step-by-step process to update it:
- Go to Settings > General > Software Update to check for any pending system updates.
- Install the latest iOS update and allow your device to reboot to complete the installation process.
- Updating your operating system can fix bugs and errors including microphone problems.
Sometimes the option for initiating and renewing subscriptions with Twitch Prime won’t appear. De-linking and re-linking your account is the fastest way to solve this issue:
- Ensure that you’re still subscribed to Amazon Prime.
- Go to your Prime Gaming account on your desktop browser or the desktop version of the Prime Gaming website on mobile. Do not use the Amazon Games mobile app.
- Click on Your Twitch Accounts.
- Select “Unlink account” and confirm unlinking.
- Return to “Your Twitch Accounts” and select “Link a Twitch account”.
- Enter the Twitch account that you just de-linked.
Once you’ve successfully re-linked your Twitch account, Twitch Prime should appear as a subscription and subscription renewal option as normal. If the above steps don’t work, try these other troubleshooting fixes:
Troubleshooting Twitch Prime Sub Not Showing Up

This problem is usually reported by users who’ve recently had their free Amazon Prime trials expire, although some users who’ve paid subscriptions may sometimes experience this issue.
However, this issue may also be caused by other factors such as server-side issues on Twitch or Amazon, your Amazon Prime subscription status, and your browser cache.
Here are some tips to address this error:
1. Check your Amazon Prime subscription status.
Your Twitch Prime Sub may not be showing up because your Amazon Prime membership has expired.
- Log into your Amazon Prime account
- Go to Manage Prime Membership
- Check the expiration date listed
- If expired, renew your Prime membership
Once you’ve renewed your Prime membership, check your Twitch sub to see if the fix worked. If not, check your linked Twitch accounts on your Prime Gaming account and ensure that your current Twitch account is linked.
2. Reset your browser data.
Browser issues like corrupt cookies or cached data can prevent Twitch Prime subs from showing correctly.
To fully reset your browser data:
- Click on Settings or Preferences in your browser
- Go to Privacy & Security
- Find the Clear Browsing Data option
- Select cookies, caches, history, site data, etc.
- Click Clear Data to reset
Note: This option will log you out of all sites that you’ve set to remember your account details and automatically sign you in, such as Instagram and Facebook. Use this only after you’ve ensured that you’re still subscribed to Amazon Prime and that your Twitch account is linked to Prime Gaming.
3. Reach out to Twitch and Prime Gaming support.
If none of the above fixes work, it may be time to get in touch with Prime Gaming’s customer support team. This is done through Twitch’s support page.
Here’s a step-by-step guide to writing a support ticket and getting a human to assist you on this issue:
- Log in to your Twitch account on your desktop browser and log in to Prime Gaming on another tab.
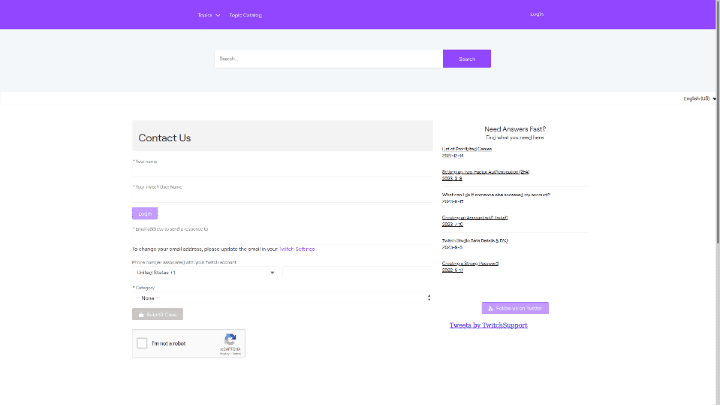
- Go to their Contact Us page.
- Fill in your details on the form. You will need to enter your email address and the phone number associated with your Twitch account.
- In the Category section, select Prime Gaming.
- You’ll be redirected to the Prime Gaming website. As you’ve already logged in the first step, you won’t need to log in upon being redirected.
- Choose Subscribe to channel with Prime Gaming from the list of issues. You’ll be redirected to a new page.
- Scroll down this page until you see a Live Chat button. Click on this button.
- You’ll be redirected to a new page with a Start Chat option. Click on this and you’ll be connected to a human Prime Gaming representative to assist you.
Once you’re in touch with a Prime Gaming representative, be sure to be as patient and thorough as possible in explaining any required details.
Instagram calls will not appear on your phone bill. Instagram uses mobile data or Wi-Fi to transmit and receive calls through the Internet. This means Instagram calls are not directly facilitated and billed by your mobile provider/phone carrier.
However, call records in Instagram remain visible on the app itself and your phone’s Phone or Call Log app.
Your mobile service provider can also bill your data usage for calling on Instagram. Large data usage from long calls will be visible on your phone bill, which can potentially raise suspicion.
If privacy is your concern, you’ll need to know all potential ways your Instagram calls can be recorded and how to counteract them. Here’s how to hide records of your Instagram calls:
Hiding Your Instagram Call Records: Fast and Simple Guide
As mentioned, Instagram calls will not appear on your phone bill. Your phone carrier and mobile provider (Verizon, T-Mobile, EE, etc.) can’t see or record any details about your Instagram calls except for its data usage.
However, logs and records of your Instagram calls can still be visible to a person secretly invading your privacy through other easily accessible ways. These include:
- Noticing your data usage. While mobile providers don’t record or bill Instagram calls, they will do this for your general mobile data usage. A person who can see the phone bill can gain a rough idea of the duration and quality of your Instagram calls this way.
- Logging in to your Instagram profile. Instagram automatically records your calls. A person can see your call and chat history if they’ve somehow managed to secretly hack or use your phone.
- Viewing your phone’s call logs. iOS devices and some Android phones record calls made on social apps. These will be visible on the main Phone or Call Logs app used for regular phone calls, which can handily be seen by anyone who has free access to your phone.
Fortunately, you can hide or erase records of your Instagram calls on both your app and phone, as well as prevent your phone and Instagram app from logging them. Here are methods to counteract attempts to invade your privacy:
1. Hide and Delete Call Logs on Instagram
Instagram regularly keeps track of your calls. Here are the two ways the Instagram app makes your call history visible:
- Logging your Instagram calls in the Calls section in Messages
- Marking the end and beginning of your calls in your chat conversations
In both instances, you can easily hide and delete traces of your calls. Alternatively, you can also turn on Instagram’s Vanish mode for your Chats to make all seen messages disappear when you close your chat.
Here’s an in-depth guide covering how to hide and delete records of your call activity on the Instagram app and activate Vanish mode:
2. Hide and Delete Call Logs on your Phone
Some smartphones keep a record of all incoming and outgoing calls from social media apps like Instagram. This is prevalent in iOS models such as iPhones and iPads, although some Android phones may do this.
Anyone who accesses your phone in secret or with your consent can quickly see these call logs by simply going to your Phone or Call Logs app.
Here are some steps to help hide or delete Instagram call logs on both iPhone and Android devices:
On iPhone:
- Open the Phone app and tap on the Recents tab to view your call history.
- Tap on the information icon (i) next to any number you want to hide from the Recents list.
- Select Hide This Call and confirm. The call will be hidden from the Recents list.
- To permanently delete call logs, go to Settings > Phone > Call History and tap Clear Call History to delete all recent calls. You can also swipe left on individual calls and tap Delete to remove specific ones.
On Android:
- Open the Phone app and tap on the Recents tab.
- Long press on a call log entry and select Remove from call log to delete individual entries.
- To mass delete call logs, tap the menu button in the top right and select Clear call log.
- If you want to hide call logs, install a third-party app like a call log deleter to selectively remove call log entries.
- You can also go to Settings > Call Logs > Menu > Clear Call Logs to delete all logged calls.
Regularly clearing your call logs is a good way to protect your privacy. Be aware that completely deleted call logs cannot be recovered.
3. Limit your Data Usage
If you’re worried that a certain person can see your Instagram calls on your phone bill, chances are this same person may also be able to see your data usage on the bill.
If they can frequently hear you call over a month and then see a large spike of mobile data usage on your phone bill, they can reasonably infer that you’ve been calling on social media apps, which can include Facebook, Viber, WhatsApp, and Instagram.
To avoid this, limit your Instagram data usage. The most reliable method is to connect your phone to the Internet via Wi-Fi instead of mobile data.
This will stop your mobile provider from knowing your data usage, preventing it from appearing on your phone bill.
There are many other ways to limit your data usage while calling on Instagram. Here are some tips to limit how much data the app uses:
- Enable Data Saver mode in the Instagram settings. This limits data usage in the background.
- Reduce the audio and video quality in the Instagram settings when making video calls. Lower quality uses less data. Avoiding video calls entirely will also significantly reduce data usage.
- Check your data usage regularly in device settings and monitor which apps are consuming the most data.
- Set a mobile data limit or warning for your device to get notified when close to your cap.
- Restrict Instagram's permissions to access mobile data in the background. Allow only when the app is in use.
Being mindful of your data consumption from Instagram and limiting unnecessary usage can help avoid spikes on your phone bill.
You can change the Wi-Fi network of your Smart Life devices in two ways:
- Removing and re-adding the devices on the Smart Life app. This is Smart Life’s built-in way to modify your devices’ Wi-Fi network. You’ll need to remove the device, add it again (“+” > Add Device), and change its Wi-Fi network from there.
- Changing your Wi-Fi’s SSID to the SSID of the network linked to your device. This is renaming your Wi-Fi network to the name that your devices remember. This changes the Wi-Fi of multiple Smart Life devices at the same time.
Here’s a guide to help you decide on which option to commit, as well as step-by-step instructions on how to do them and more helpful details for efficiently changing your Smart Life device’s Wi-Fi network:
Changing Your Wi-Fi Network on Smart Life: An In-Depth Guide
Your Smart Life devices’ linked Wi-Fi network may require changing after making any significant modifications to your home Wi-Fi. Some common examples of this include:
- Switching Internet Service Providers (ISP)
- Changing your Wi-Fi name or password
- Replacing or upgrading your router/modem
- Connecting your Smart Life devices to a sub-network, such as a Wi-Fi extender
These situations often reset your Wi-Fi network and necessitate updating your Smart Life device’s Wi-Fi network to be in sync. Otherwise, your devices will operate sub-optimally as they need a Wi-Fi connection to properly function.
You can change your Smart Life device’s Wi-Fi network either by manually removing and adding the devices on the Smart Life app or changing your Wi-Fi’s service set identifier (SSID) to the SSID of the network linked to the devices.
Do note that these two solutions have some differences well worth considering. Here’s a quick table on how these two methods compare:
| Methods | Pros | Cons |
| Manually removing and re-adding devices | Surest way to change Wi-Fi network | Tedious, especially for many devices; clears automations |
| Changing Wi-Fi SSID to device-linked network SSID | Can change network for multiple devices at once | Not guaranteed to work; risks disconnecting all devices |
Both solutions work for all Smart Life-compatible devices. Manually removing and re-adding your Smart Life devices will involve the same process, and changing your Wi-Fi’s SSID will automatically apply to all connected devices.
These solutions also work even if your Smart Life devices are connected to a home assistant such as Google Home or Alexa. However, you’ll need to reconfigure your Smart Life devices on your home assistant after changing your Wi-Fi network.
Manually re-adding the devices or changing the Wi-Fi SSID?
Changing the Wi-Fi SSID is the fastest way to change the Wi-Fi network of multiple Smart Life devices at the same time. It also risks disconnecting your Smart Life devices from the Wi-Fi network they remember.
This can be inconvenient if you still need your devices to function on the old Wi-Fi network while changing them to the new one. For example, you may have some important appliances or devices connected to your Smart Life-compatible sockets.
Thus, if you own multiple Smart Devices, you may be weighing the risk of accidentally disconnecting all your Smart Life devices on their remembered Wi-Fi against the tedium of manually re-adding your devices on your Smart Life app.
Here’s a good rule-of-thumb: For five or more Smart Life devices, change the Wi-Fi SSID to the device-linked network SSID as your first solution. If you have less than five devices, you’ll likely save more time removing and re-adding your devices.
Changing your Wi-Fi SSID is also a procedure that varies depending on your ISP and router, generally taking around 15-30 minutes. Usually, you’ll need to go on your web browser or the ISP’s app and reconfigure your Wi-Fi’s SSID from there. So, if you have less than five devices, you might as well manually re-add them on the Smart Life app and avoid the risk of disconnecting all your devices from your Wi-Fi.
2 Effective Ways for Changing Your Smart Life Wi-Fi Network
1. Removing and re-adding the Smart Life device in the Smart Life app
Removing and re-adding your Smart Life devices is the only way to natively change their connected Wi-Fi network. Unfortunately, there’s currently no way to simultaneously change the Wi-Fi for multiple devices in the Smart Life app.
Removing and re-adding your Smart Life devices also erases any automation routines. You’ll need to reconfigure any routines like Tap-to-Run or routines set in Alexa or Google Home.
While an inconvenience, this is the most certain way to change your Smart Life devices’ Wi-Fi network. Be ready to enter your Wi-Fi password, as you will need to provide this multiple times for each Smart Life device.
Removing and resetting your Smart Life device
- Open your Smart Life app on your phone or tablet.
- Log in to the app with your Smart Life account.
- Tap on the device whose Wi-Fi network you’d like to change.
- Tap on the pencil icon on the top-right of the screen.
- Scroll down and tap on Remove Device.
- Tap on Disconnect and Wipe Data, and tap Confirm. This “hard” resets the device.
- After resetting the device, it’s time to re-add it to the Smart Life app with the new Wi-Fi network.
Re-adding your Smart Life device in the Smart Life app
- On the top-right corner of the Devices page of your Smart Life app, tap “+” > Add Device.
- Select your device from the selection of Smart Life-compatible devices.
- Select your desired Wi-Fi network and enter your Wi-Fi password.
- Tap on Next.
- Follow the prompts to pair your Smart Life device to your Smart Life app. You’ll usually need to turn off your Smart Life device, turn it back on, hold its RESET button to initiate pairing mode, and confirm that it’s been successfully paired on the app.
- If the pairing process is successful, the Smart Life app will indicate that the device has been added. Once added, it should now be connected to the new Wi-Fi network you desire.
2. Changing your new Wi-Fi’s SSID and password to the Wi-Fi SSID and password linked to your Smart Life device
Since there’s no way to natively change the Wi-Fi network of multiple Smart Life devices at the same time, one popular workaround is to change the Wi-Fi’s SSID to the one saved in the devices.
To break it down, your Smart Life devices “remember” the name (SSID) and password of the old Wi-Fi network. The devices automatically connect to the name and password of the SSID they remember.
Changing the new Wi-Fi network’s name (SSID) and password to the old Wi-Fi SSID and password that the Smart Life devices remember will “trick” the devices into connecting to the new network without needing to manually re-add them.
The specific steps for changing your Wi-Fi’s SSID and password depend on your router and ISP. Consider contacting your ISP or checking your router’s manual to know the proper procedure for changing your Wi-Fi SSID and password for your particular ISP and router.
The video and steps below demonstrate one of the most common ways to change your Wi-Fi SSID and password on a phone, tablet, or computer.
Changing your Wi-Fi’s SSID and password to the SSID and password remembered by the Smart Life device
Note: Doing this procedure will disconnect other devices currently connected to your Wi-Fi network. You’ll need to reconnect these devices to your Wi-Fi network after changing the SSID. You’ll also need to re-enter your Wi-Fi password if you’ve changed it.
- Know your router IP address. This can be usually seen at the back or underside of your Wi-Fi router. You can also go to your network’s Wi-Fi settings on your phone or computer to see your router IP address.
- Open any browser on your phone, tablet, or computer. Enter your router IP address in the search bar. This will open your router’s configuration page.
- You’ll be prompted to enter account credentials. If you rarely change your router’s configuration, the username and password are typically “admin”.
- If “admin” doesn’t work, look behind or under your router to see the credentials. Otherwise, consult the person who handles your home network or contact your ISP.
- Navigate to your Wi-Fi options and change your Wi-Fi’s name (SSID) to the one your Smart Life devices remember. Typically, this is the name of the Wi-Fi network before being changed or modified.
- Navigate to your Security options. Then, change your Wi-Fi password to the Wi-Fi password your Smart Life devices remember. (If the Wi-Fi password of the new Wi-Fi network is the same as the remembered network, no need to change this).
- Once you’ve finished changing your Wi-Fi’s SSID and password, your Smart Life devices should automatically connect to your new Wi-Fi network.
If your Geeni light bulb isn’t connecting to your Wi-Fi network, then you may be experiencing network connectivity issues due to errors in your device and/or router. Before considering a replacement, we recommend these fixes first:
- Initiate a soft reset
- Update your smart home app
- Switch to a different smart home app
- Use a 2.4GHz Wi-Fi network
- Check your router connection
These five user-tested solutions will cover the majority of connectivity issues that may prevent your Geeni bulb from linking with your home network, addressing their most likely causes in your smart bulb, mobile device, router, and smart home app.
By following the fixes below, you should be able to test all possible points of failure, resolving your Geeni light bulb’s connection problems or, at the very least, providing Geeni support with valuable diagnostic information. We’ll walk you through them!
Troubleshooting a Geeni Light Bulb That's Not Connecting
Reset Your Geeni Light Bulb
Before attempting any other fixes below, we recommend resetting your Geeni Light Bulb first! This involves turning the light bulb on and off and reconnecting it to your device through your smart home app.
This clears any temporary glitches and restarts the connection process, erasing any undetectable errors in your network!
There are two ways to do a reset on your Geeni light bulb: Easy Mode and Access Point (AP) Mode. These modes accomplish the same outcome, although AP Mode is a bit more involved and will allow you to manually select your specific Geeni smart bulb.
We recommend Easy Mode for a fast reset procedure and AP mode if you have other active Geeni smart bulbs while fixing your malfunctioning bulb.
That said, the reset instructions below are for the Geeni app, although other smart home automation apps (like Smart Life or Tuya) also allow for resetting through the same modes.
If you use a smart home app other than Geeni, we recommend following the steps according to your app’s instructions.
Reset with Easy Mode
Easy Mode is the quick pairing set-up that automatically selects your smart bulb upon attempting to pair - a fast process for a smooth and convenient reset.
- Turn your Geeni light bulb on and off three times via its switch or by twisting it in its socket. This removes any built-up electricity and disconnects it from your Geeni app.
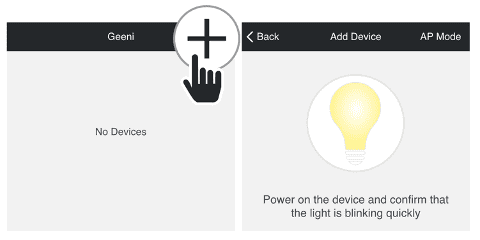
- In the Geeni app, navigate to Devices and select the ‘+’ symbol in the top right corner of the screen.
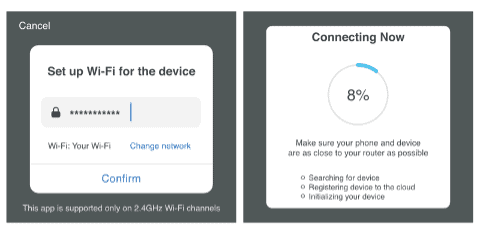
- Your Geeni smart bulb will then flash quickly. When it does this, tap on Next Step.
- Enter your Wi-Fi network and password, and select Confirm.
Your Geeni app will now try to connect to your smart bulb. Once finished, you have fully accomplished the reset.
Reset with Access Point (AP) Mode
AP mode is slower and will require you to choose your smart bulb from your network list - best for picking it out of multiple smart home devices. Do this method if you have multiple active Geeni light bulbs and need to single out the faulty bulb.
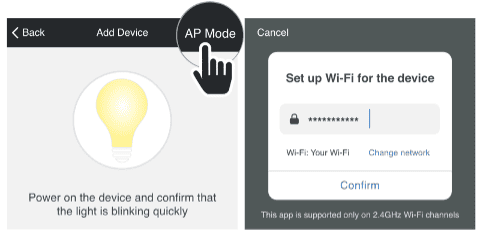
- Switch your Geeni light bulb on and off three times via a switch or twisting it in its socket. By doing this, you totally remove any remaining charge in the bulb and unlink it from your Geeni app.
- Go to Devices on the Geeni app and tap on the ‘+’ symbol in the top right corner of the screen. This will prompt your Geeni bulb to flash, indicating that it’s ready to pair.
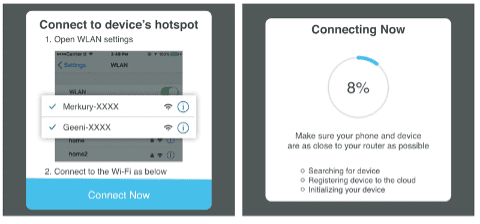
- Select AP Mode on the top right and enter your Wi-Fi credentials.
- On the list of networks that appear, select the faulty Geeni smart bulb and tap on Connect Now.
Your Geeni app will then process your device’s connection to the smart bulb. When this is done, you have completed the reset.
Update Your Smart Home App
Keeping your smart home app updated is key for maintaining connectivity with your Geeni light bulb. App developers regularly release patches, fixes, and improvements that could resolve the issue of your Geeni light bulb not connecting.
Thankfully, updating your smart home app can be done in a few minutes for both Android and iOS devices!
Updating your smart home app on an iOS device
To update your smart home app on an iOS device, open the App Store, and tap your profile icon in the top right. On the next menu, under Upcoming Automatic Updates, scroll down until you see your smart home app and tap on Update next to its entry to begin updating it!
You can also opt to update all your outdated apps by tapping on Update All right under Upcoming Automatic Updates. This will cover all apps with pending updates as well as your smart home app.
Once you’ve selected either Update or Update All, the update for your smart home app will automatically be downloaded and installed. When done, select Open right next to its entry on the list of apps to confirm your updates.
After confirming your updates, reset your Geeni smart bulb following the instructions in the section above, and then reconnect it to your device as normal. Your smart bulb should now work with your updated app!
Updating your smart home app on an Android device
For Android devices, start by opening the Google Play Store and tapping on your profile picture in the top right of your screen. In the next menu, select Manage apps and device - this opens a menu where you can make changes to your apps.
Under Overview you should see two options: Update all and See details. Select See details to open a list of apps and see their update status. On that list, scroll to your smart home app and hit the Update next to it - starting the update’s download process!
Alternatively, you can select Update all instead of See details to begin updating your smart home app along with all other outdated apps on your device. This will cause them to begin downloading their app’s update packages - your smart home app included!
Once installed, open your smart home app to finalize the updates. Afterwards, reset your smart bulb using the steps explained in the previous section, and connect it to your device as usual. Your newly updated app should now clear up your connectivity issues!
Switch Your Smart Home App
If connectivity issues persist even after updating your smart home app, try linking your Geeni smart bulb to a different smart home app. Your current smart home app may be bugged due to internal errors or incompatibilities with your device.
Switching to popular alternatives like Smart Life, Amazon Alexa, and Tuya Smart can provide better connectivity as they may turn out to be more compatible with your system. This frees you from any lingering software glitches in the old app.
How to switch your smart home app
To switch your smart home app, you’ll need to unlink your Geeni smart bulb from your current app. The process for doing this varies according to the smart home app, but you’ll generally just need to go to your smart bulb’s device settings and disconnect it from there.
Once you’ve accomplished that, download the new smart home app from Google Play Store or the Apple App Store.
When finished downloading, open the new app and follow the on-screen pairing instructions to connect your Geeni bulb. You may need to create an account if it's your first time using the app.
Once connected, test controlling your Geeni bulb through the new app interface. If functionality is restored, you can continue using this alternative smart home platform going forward.
Use a 2.4GHz Wi-Fi Network
Switching your Wi-Fi network frequency band can help resolve connectivity issues with your Geeni light bulb.
Geeni bulbs only operate on the 2.4GHz band (which is more suited for multiple long-range connections), not the newer 5GHz band (which is more suited for high-speed, short-range connections).
If you have a dual-band Wi-Fi router that simultaneously transmits both bands, then you should be able to connect to 2.4GHz mode automatically. Doing this is easy - reset your Geeni bulb as shown earlier and connect it to your 2.4GHz network!
However, if you have a single-band router or a dual-band router that only transmits one band at a time, then you’ll have to switch it to 2.4GHz using the router’s administrator controls.
Switching from 5GHz to 2.4GHz frequency band
The procedure for accessing your router’s admin controls will depend on your router’s model and your Internet Service Provider. You can check for this by referring to your router’s manual or contacting your ISP for instructions.
In general, you’ll need to enter your network’s default gateway in your web browser (which you can identify via the command terminal on a PC) and log in to your router’s administrator page to change the band. Here’s a helpful video showing the process:
Keep in mind that switching your Wi-Fi frequency band will disconnect any devices that don’t recognize your 2.4GHz network. If the issue still persists, however, then it may be time to examine the router itself for any issues.
Check Your Router Connection
Problems with the router’s connection and specifications can prevent your Geeni bulb from linking with your mobile device. These issues can include disruptions to your router’s signal as well as issues within the router’s hardware itself.
For instance, outdated or low-quality routers will struggle to support more than five smart home devices at the same time - your Geeni smart bulb included.
This coupled with disruptions to its signal such as thick obstacles and other wireless devices makes it impossible for a new Geeni light bulb to connect. Here’s how to deal with them both:
Remove disruptions to the router’s signal
First, eliminate external disruptions muddying your router’s connection. The two most frequent culprits for this are signal obstructions and excessive distance between the router and the devices.
For instance, solid walls, furniture, and other wireless devices can degrade the signal’s quality, causing your Geeni light bulb not to connect.
If possible, ensure that your router is close enough to your Geeni smart bulb to support it, with the device being no more than 100-150ft away from your router indoors and 300ft away outdoors.
Likewise, keep the connection between your bulb and router clear of any walls, furniture, and active wireless devices such as Bluetooth gadgets.
By removing these disruptions to your router’s signal, you increase your Geeni smart bulb’s connection quality and prevent it from plateauing at speeds that disconnect it.
Examine the router itself
Low-performance router software and hardware may be why your Geeni light bulb fails to connect to your device. It’s reasonable to suspect this as the culprit especially if you’ve eliminated signal disruptions and have set your Wi-Fi frequency band to 2.4GHz.
At this point, it may be worth considering a direct hardware upgrade. We recommend contacting your ISP and consulting their associated network technician - they should assist you in identifying the upgrade best suited for your smart home set-up.
While a costly fix, this is a worthwhile investment if you plan to keep up a large smart home system. Hence, investing in a robust Wi-Fi foundation pays dividends for not only getting your Geeni bulb back online, but enhancing all smart home activities.